Posts

Showing posts from January, 2023

how to crochet a heart bag & keychain with wings | pattern + video tutorial

Image
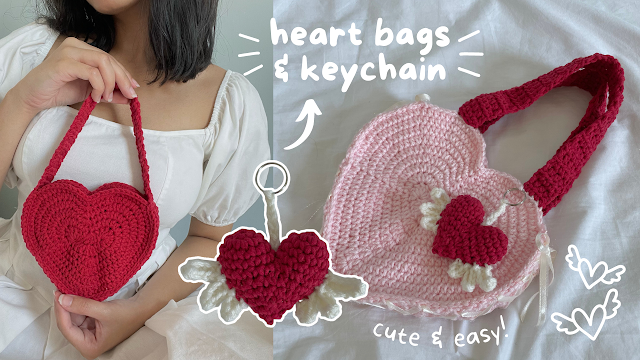
Hi everyone, today starts the beginning of my valentine's day pattern/tutorial collection! We're starting with a cute accessory to wear with your outfits - a heart-shaped bag* and an adorable little key chain. Before following the pattern, I highly recommend watching the video tutorial . If you're confused at any point on how to follow the pattern, I explain with demonstrations in that tutorial! Abbreviations used: ch - chain / sc - single crochet / ss - slip stitch / hdc - half double crochet / dc - double crochet Pattern explanations: If the number comes before the stitch name - insert that number into the same stitch. Eg. 2 hdc means that you have to insert 2 hdc into the same stitch. If the number comes after the stitch name - insert that stitch into the next 'number' stitches. Eg. 1 sc x 3 means that you have to insert 1 sc into the next 3 stitches. More examples -  2 dc x 2 means that you have to insert 2 dc (into the same stitch) for the next 2 stitches. 1 h

matching pair of heart bookmarks - crochet pattern & tutorial

Image
Hi everyone! Here's the written pattern for bookmarks for both sides of the heart (left & right). This is a companion pattern to my YouTube tutorial which you can watch here to understand how to switch colors. These bookmarks will also make the cutest little gifts for you & your reader friends/family! Abbreviations & materials used: sc - single crochet / ch - chain / BC - background color / CC - contrasting color (color of the heart) / I used a 4.5 mm hook & 100% acrylic yarn to make my bookmarks sturdy. If you want to adjust the size of these bookmarks (eg. make the heart bigger or the bookmark wider), you can learn how to create & crochet with your own pixel grids from this tutorial of mine. Bookmark 1 (heart's right side) Row 1: start with a slip knot and ch 6, sc into the 2nd ch from your hook, insert 1 sc into every ch (total 6 stitches in each row which is the same number of boxes in the pixel grid) Row 2 - 10: insert 1 sc into every stitch with BC R

how to create, design, & crochet ANYTHING with pixel grids - featuring the My Row Counter app!

Image
Hi everyone! My recent YouTube video (a guide on how to crochet grids which you can watch here ) featured a lot of tools, methods, and techniques. Here's a clear and quick summary of everything I mentioned in the 40-minute guide. Step 1: Decide what piece you want to make and its size (including measurements like width and height/length) For example, a bookmark that has a width of 5 cm and a height of 15 cm. Step 2: Determine the gauge (the size of your stitch) based on what yarn and hook size you're usin To do this, crochet a scrap piece with the stitch you want to use for your project. Then, with a ruler/inch tape, record these 2 measurements: the width of 1 stitch and the height of 1 row . Step 3: Calculate the number of stitches and rows needed for your piece based on the gauge This part involves a bit of math! To calculate the number of stitches needed, divide the 'width you want' by the 'width of 1 stitch' . To calculate the number of rows needed, divi