how to create, design, & crochet ANYTHING with pixel grids - featuring the My Row Counter app!
Hi everyone! My recent YouTube video (a guide on how to crochet grids which you can watch here) featured a lot of tools, methods, and techniques. Here's a clear and quick summary of everything I mentioned in the 40-minute guide.
Step 1: Decide what piece you want to make and its size (including measurements like width and height/length)
For example, a bookmark that has a width of 5 cm and a height of 15 cm.
Step 2: Determine the gauge (the size of your stitch) based on what yarn and hook size you're usin
To do this, crochet a scrap piece with the stitch you want to use for your project. Then, with a ruler/inch tape, record these 2 measurements: the width of 1 stitch and the height of 1 row.
Step 3: Calculate the number of stitches and rows needed for your piece based on the gauge
This part involves a bit of math! To calculate the number of stitches needed, divide the 'width you want' by the 'width of 1 stitch'. To calculate the number of rows needed, divide the 'length/height you want' by the 'height of 1 row'.
Step 4: Create a pixel grid canvas and start designing!
There are 2 ways to do this - If you want to work on your phone/laptop, you can create a blank canvas of grid boxes on https://friendship-bracelets.net/generators/alpha, the width is the number of stitches and the height is the number of rows that you calculated in the previous step. If you'd rather draw, you can use graph/math paper or any paper that has pixel-like boxes. Draw the outline of your piece using the width and height measurements and then color in the boxes to make your design.
For the next 2 steps, I will be using the Row Counter app.
Disclosure: This post is sponsored by Row Counter App. All opinions and recommendations are my own.
Quick links to Row Counter app (available to download on iOS & Android):
Website: https://bit.ly/myrowcounter
iOS: https://bit.ly/iosmyrowcounter
Google Play Store: https://bit.ly/
This app features a lot of handy tools for crocheters (and knitters!) such as:
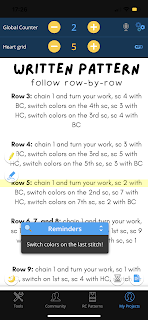
Row counters (multiple counters per project and you can set reminders for rows as well!). You can import patterns from anywhere into the app (PDFs, Ravelry, Hobbii, Google Drive, and lots more). Highlighter and drawing tool for directly marking important information on your imported pattern. A bunch of free and accessible crochet and knit patterns are also available on the app (including the pattern for my 'lover' shoulder bag which you can view here!)
Step 5: Preview what your pixel grid design will look like using the 'chart' tool on the My Row Counter app, make adjustments depending on the preview!
You can find the chart tool in the 'pattern creator' when you choose to add content. Replicate your pixel grid design on the chart (using the same stitch/colors that you'll use for your final piece) then click on 'chart preview' to see what your work will look like without having to actually crochet it! You can make adjustments to the chart as necessary.
Step 6: Create a pattern using the 'pattern creator' tool on the Row Counter app
If your project is made up of different pieces (for example, a front and back piece), add 'parts' to your pattern. Then add the 'chart' to your pattern featuring your pixel grid design. Next, using the 'text' content tool, add instructions for each row of your pixel grid. Count how many stitches of each color you have to do (by counting the boxes in the grid) before you switch to the next color, and how many stitches of that color you'll have to do next. For example, the pattern for a row might go something like this: 4 sc with white, 1 sc with pink, 5 sc with white, 3 sc with pink. I recommend doing this so that you can easily continue crocheting your rows rather than stopping after every row and painstakingly counting the boxes and keeping track of rows manually.
Step 7: Follow the grid to crochet your piece using any method you're comfortable with
In the YouTube tutorial, I go over 2 methods: carrying your yarn as you crochet and leaving it to dangle on the wrong side until you need to use that color again. I also show you how and when to switch colors, so I recommend watching that part of the video which starts at 14:38.
Here's a bunch of idea boards on Pinterest for inspiration for your pixel grid crochet piece...
Pixel grid ideas: https://pin.it/5iCoWfb Crochet pieces ideas: https://pin.it/2TGj2vZ


very interesting and nice digitizing embroidery service post
ReplyDelete