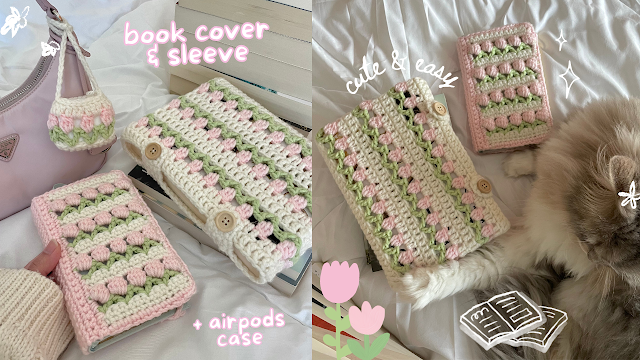
how to crochet tulip book cover & sleeve | free pattern + video tutorial for beginner-friendly tulip stitch
Hi everyone! This is the companion pattern for my youtube tutorial. Please keep in mind that you can customize these patterns to make your piece ANY SIZE. Always refer to the video tutorial if you're confused for a clear demonstration.
ss - slip stitch / sc - single crochet / dc - double crochet
Book Cover
Front:
Chain a length that's the same as the width of your book (the total number of chains should be a multiple of 3 + 2)
Row 1 - skip the 1st chain then sc into every chain
Row 2 - chain 1, turn your work, sc into every stitch, change colours to green in the last sc
LEAVES Row 3 - chain 4, turn your work, dc into the 1st stitch, repeat *skip 2 stitches, dc into 3rd stitch, chain 2, dc in the same stitch*, change colours to pink in the last dc
TULIPS Row 4 - chain 2, repeat *insert a 5 dc cluster into every chain 2 space, chain 2*, change colors to white in the last cluster
Row 5 - chain 1, repeat *1 sc in every tulip stitch, 2 sc in every chain 2 space*
Row 6 - chain 1, turn your work, sc into every stitch
Row 7 onwards - repeat the steps for the leaves, tulips, and plain rows until the cover is the same size as your book
Border:
Attach your yarn in the right-hand bottom corner of the front pieces - ss along all 4 edges
Book spine:
Crochet rows of sc until the piece covers the spine of your book (do not chain 1 when starting a new row, simply turn your work and sc into the 1st stitch)
Back:
Crochet rows of dc until the piece covers the back of your book (do not chain 2 when starting a new row, simply turn your work and dc into the 1st stitch)
Clasps (do this on all 4 corners of your cover, work on the back side):
Attach your yarn with a knot, chain 3-4 (make sure it's tight), slip stitch to join back, fasten off
Sleeve (you can make this any size and use it for your laptop, ipad, book, etc)
Chain the length that you want (the total number of chains should be a multiple of 3)
Round 1 - Skip the 2 chains near your hook then dc into the 3rd chain, dc into every chain, insert 2 more dc in the last chain
Dc into the other side of the chains as well, insert 1 more dc into the last chain
The total number of dc stitches should be a multiple of 3 + 1, then ss into the chain 2
Round 2 - chain 2, dc into every stitch, insert hook into the chain 2 then change colours
LEAVES Round 3: chain 4, dc into the 1st stitch, repeat *skip 2 stitches, dc into 3rd stitch, chain 2, dc in the same stitch*, insert hook into the chain 4 then change colours
TULIPS Round 4: chain 2, repeat *insert a 3 dc cluster into every chain 2 space, chain 2*, insert hook into the chain 2 then change colours
Round 5 - chain 2, repeat *1 dc in every tulip stitch, 2 dc in every chain 2 space*, ss into chain 2
Round 6 - chain 2, dc in every stitch
Round 7 onwards - repeat the steps for the leaves, tulips, and plain rounds until the sleeve is the size you want
Optional: sew on buttons and crochet clasps like the demonstration in the video
connect with me and share your work in our community by tagging me on instagram & tiktok @mahumcrochets - lots of love as always,


Comments
Post a Comment