Posts

how to crochet a cute bunny holding a heart | amigurumi tutorial (no magic ring!) + free pattern

Image
Hi everyone! This is the written pattern for my youtube tutorial  (please refer to it for all the demonstrations). I've included timestamps from the video so you can refer to video demonstrations if you're confused about a specific part. If you've never crocheted a plushie before, I also recommend taking the time to go through my guide to amigurumi video first which will help you understand how it works.  Abbreviations & terminology ss - slip stitch / sc - single crochet / increase - 2 sc in the SAME stitch / work in continuous rounds and use a stitch marker/bobby pin to mark the first stitch of every round Part 1: Head Start by making a slip knot, chain 4, ss into the first chain, insert the stitches into the the circle formed between the chains ( 1:11 in video) Section 1 - increase rounds ( 1:59 in video) Round 1 (total 8): 8 sc Round 2 (total 16): 2 sc in every stitch  Round 3 (total 24): 1 sc, increase Round 4 (total 32): 2 sc, increase Round 5 (total 40): 3 sc,...
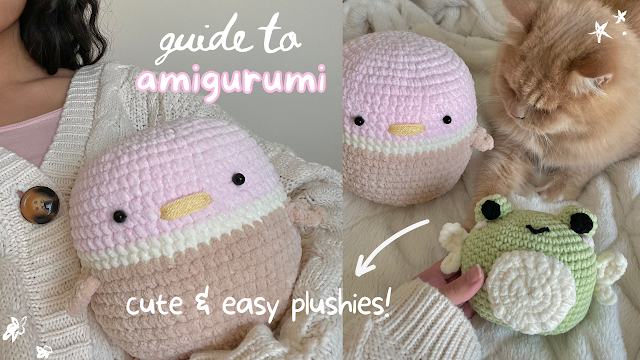
cute & easy DUCK & FAIRY FROG plushie - free amigurumi patterns + video tutorial (inspired by squishmallows!)

Image
Hi everyone, here's how to make these 2 easy & adorable squishmallow-inspired amigurumi plushies! Please note that this is a companion free pattern for my in-depth youtube tutorial . I highly recommend referring to the video for demonstrations for all the parts if you're confused, that's why I've mentioned the exact timestamp for the steps .  Abbreviations & terminology ss - slip stitch / sc - single crochet / increase - 2 sc in the SAME stitch / work in continuous rounds and use a stitch marker/bobby pin to mark the first stitch of every round  ice cream duck 🍦 Part 1: top section (increase rounds - 7:54 in video) Make a magic ring (or make a slip knot, chain 4, ss into the 1st chain, work the following stitches in the circle made in between the chains -  if you're confused, you can watch the video at  8:58 ) Round 1 - 8 sc Round 2 (16) - 2 sc (increase) in every stitch  Round 3 (24) - 1 sc, increase Round 4 (32) - 2 sc, increase Round 5 (40) - 3 sc, ...

how to crochet easy bag charms - star, butterfly, & photocard holder (free patterns + video tutorial)

Image
Hi everyone! These are the written patterns for my youtube tutorial . I'd love to see which one you'll make, tag me on instagram or tiktok @mahumcrochets Mini star: Make a magic ring (we're going to work in continuous circles so please use a stitch marker or bobby pin to mark the first stitch of each round, start the next round from the first stitch of the previous round ) Round 1 (total 5 st): insert 5 sc into the magic ring Round 2 (total 10 st): insert 2 sc into every stitch Round 3 (total 15 st): repeat *1 sc, 2 sc in the same stitch* Round 4 (repeat to make 5 points of the star): insert in the same st *sc, hdc, dc, hdc, sc* , then ss into the next 2 stitches Slightly bigger star: Make a magic ring (we're going to work in continuous circles so please use a stitch marker or bobby pin to mark the first stitch of each round,  start the next round from the first stitch of the previous round ) Round 1 (total 5 st): insert 5 sc into the magic ring Round 2 (total 10 st): ...

how to crochet ANY iPad/laptop/kindle/book sleeve with pixel grid designs (step-by-step guide)

Image
Hi everyone! As part of my in-depth youtube tutorial , here's a summary of how to design & crochet ANY sleeve for your ipad/laptop/kindl e with pixel grids <3 Step 1: PLAN Decide on which object you want to make the sleeve for and have a general idea about what pixel grid design you want to create. I've got a ton of designs and inspirations saved on this Pinterest board (I regularly update the board with new pieces I've found!). Step 2: BACK PIECE Crochet a plain back piece for your sleeve. To do this, start with a slip knot, then chain the same length as your object. Write down how many stitches (this is the width) and rows (this is the height) you made. [ Optional step 1 :  If you're making this sleeve for a thicker object, crochet a few extra rows to make up for the thickness before you start following the grid for the front piece. For example,  ] Step 3: PIXEL GRID This is the site where I like creating my pixel grids (you could also use graph paper or draw ...

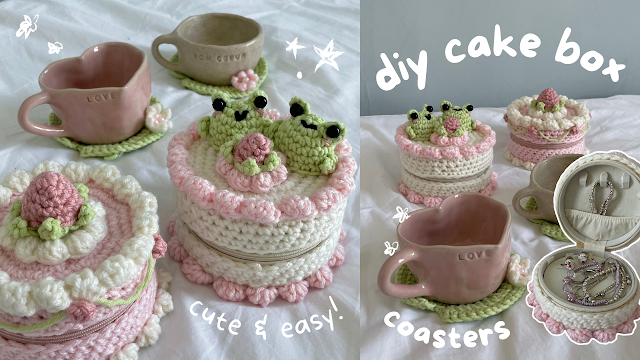
diy crochet cake box (with frogs, frosting, and strawberries!) | pattern + video tutorial

Image
Hi everyone! These are the written patterns for my YouTube tutorial . I highly recommend watching the video to better understand how to follow the patterns since this project is completely customizable and leaves room for you to come up with your own patterns. Lots of love as always <3 still loading...

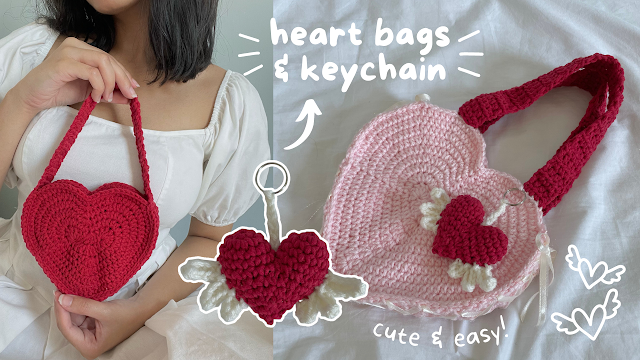
how to crochet a heart bag & keychain with wings | pattern + video tutorial

Image
Hi everyone, today starts the beginning of my valentine's day pattern/tutorial collection! We're starting with a cute accessory to wear with your outfits - a heart-shaped bag* and an adorable little key chain. Before following the pattern, I highly recommend watching the video tutorial . If you're confused at any point on how to follow the pattern, I explain with demonstrations in that tutorial! Abbreviations used: ch - chain / sc - single crochet / ss - slip stitch / hdc - half double crochet / dc - double crochet Pattern explanations: If the number comes before the stitch name - insert that number into the same stitch. Eg. 2 hdc means that you have to insert 2 hdc into the same stitch. If the number comes after the stitch name - insert that stitch into the next 'number' stitches. Eg. 1 sc x 3 means that you have to insert 1 sc into the next 3 stitches. More examples -  2 dc x 2 means that you have to insert 2 dc (into the same stitch) for the next 2 stitches. 1 h...

matching pair of heart bookmarks - crochet pattern & tutorial

Image
Hi everyone! Here's the written pattern for bookmarks for both sides of the heart (left & right). This is a companion pattern to my YouTube tutorial which you can watch here to understand how to switch colors. These bookmarks will also make the cutest little gifts for you & your reader friends/family! Abbreviations & materials used: sc - single crochet / ch - chain / BC - background color / CC - contrasting color (color of the heart) / I used a 4.5 mm hook & 100% acrylic yarn to make my bookmarks sturdy. If you want to adjust the size of these bookmarks (eg. make the heart bigger or the bookmark wider), you can learn how to create & crochet with your own pixel grids from this tutorial of mine. Bookmark 1 (heart's right side) Row 1: start with a slip knot and ch 6, sc into the 2nd ch from your hook, insert 1 sc into every ch (total 6 stitches in each row which is the same number of boxes in the pixel grid) Row 2 - 10: insert 1 sc into every stitch with BC R...