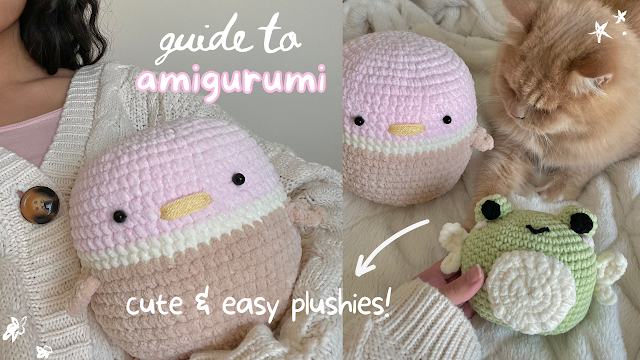
cute & easy DUCK & FAIRY FROG plushie - free amigurumi patterns + video tutorial (inspired by squishmallows!)
Hi everyone, here's how to make these 2 easy & adorable squishmallow-inspired amigurumi plushies! Please note that this is a companion free pattern for my in-depth youtube tutorial. I highly recommend referring to the video for demonstrations for all the parts if you're confused, that's why I've mentioned the exact timestamp for the steps.
Abbreviations & terminology
ss - slip stitch / sc - single crochet / increase - 2 sc in the SAME stitch / work in continuous rounds and use a stitch marker/bobby pin to mark the first stitch of every round
ice cream duck 🍦
Part 1: top section (increase rounds - 7:54 in video)
Make a magic ring (or make a slip knot, chain 4, ss into the 1st chain, work the following stitches in the circle made in between the chains - if you're confused, you can watch the video at 8:58)
Round 1 - 8 sc
Round 2 (16) - 2 sc (increase) in every stitch
Round 3 (24) - 1 sc, increase
Round 4 (32) - 2 sc, increase
Round 5 (40) - 3 sc, increase
Round 6 (48) - 4 sc, increase
Round 7 (56) - 5 sc, increase
Round 8 (64) - 6 sc, increase
Part 2: body (repeat rounds - 18:34 in video)
Round 9 to 14 (64 stitches in all of these rounds) - 1 sc in every stitch
Switch colors - demonstration at 36:08 in video
Round 15 and 16 (64 stitches in all of these rounds) - 1 sc in every stitch
Switch colors - demonstration at 36:08 in video
Round 17 to 25 (64 stitches in all of these rounds) - 1 sc in every stitch
Part 3: bottom section (decrease rounds - 20:49 in video)
Round 26 (56) - 6 sc, decrease
Round 27 (48) - 5 sc, decrease
Round 28 (40) - 4 sc, decrease
Round 29 (32) - 3 sc, decrease
Round 30 (24) - 2 sc, decrease
Round 31 (16) - 1 sc, decrease
Round 32 (8) - decrease
Round 33 (demonstration in video) - decrease until the hole is almost closed then slip stitch and fasten off
Part 4: wings (work directly on the body of the duck - in video)
Row 1 - attach your yarn and chain 1, sc x 4
Row 2 - chain 1 and turn your work, sc x 4
Row 3 - 2 sc decrease then fasten off
fairy frog 🧚
Part 1: top section (increase rounds - 7:54 in video)
Make a magic ring (or make a slip knot, chain 4, ss into the 1st chain, work the following stitches in the circle made in between the chains - if you're confused, you can watch the video at 8:58)
Round 1 - 8 sc
Round 2 (16) - 2 sc (increase) in every stitch
Round 3 (24) - 1 sc, increase
Round 4 (32) - 2 sc, increase
Round 5 (40) - 3 sc, increase
Round 6 (48) - 4 sc, increase
Part 2: body (repeat rounds - 18:34 in video)
Round 7 to 12 (48 stitches in all of these rounds): 1 sc in every stitch
Part 3: bottom section (decrease rounds - 20:49 in video)
Round 13 (40) - 4 sc, decrease
Round 14 (32) - 3 sc, decrease
Round 15 (24) - 2 sc, decrease
Round 16 (16) - 1 sc, decrease
Round 17 (8) - decrease
Round 18 (demonstration at 25:00 in video) - decrease until the hole is almost closed then slip stitch and fasten off
Part 4: eyes (demonstration at 25:48 in video)
Make a magic ring (or make a slip knot, chain 4, ss into the 1st chain, work the following stitches in the circle made in between the chains - if you're confused, you can watch the video at 8:58)
Round 1 - 8 sc
Round 2 (16) - 2 sc (increase) in every stitch
Round 3 (16) - 1 sc in every stitch
Part 5: white circle
Make a magic ring (or make a slip knot, chain 4, ss into the 1st chain, work the following stitches in the circle made in between the chains - if you're confused, you can watch the video at 8:58)
Round 1 - 8 sc
Round 2 (16) - 2 sc (increase) in every stitch
Round 3 (24) - 1 sc, increase
Round 4 (32) - 2 sc, increase
Part 6: wings (demonstration at 31:42 in video)
Big part of the wing - make a slip, chain 5, skip the first chain then sc x4, insert 2 more sc in the last chain, work on the other side of the chains now...sc x2, ss, continue directly to the next part
Small part of the wing - chain 3, skip the first chain then sc x2, ss into the stitch at the bottom of the big wing
connect with me and share your work in our community by tagging me on instagram & tiktok @mahumcrochets - lots of love as always,


Comments
Post a Comment